[Guide] Microgreens Comprehensive Growing Guide
![[Guide] Microgreens Comprehensive Growing Guide](http://cityfarm.my/cdn/shop/articles/4_1024x.jpg?v=1622550306)
Microgreens Comprehensive Growing Guide
Including:
- Wheatgrass
- 13 types of microgreen
| Microgreen | Suggested Harvest (Day) |
| Sunflower | 7 |
| Corn | 7 |
| Wheatgrass | 10 |
| Wheatgrass | 10 |
| Arugula | 10 |
| Radish | 10 |
| Alfalfa | 12 |
| Wasabi Mustard | 12 |
| Pea | 14 |
| Red Amaranth | 15 |
| Parsley | 20 |
| Beet | 21 |
| Dill | 25 |
| Coriander |
28 |
Table 1 is the suggested harvesting day printed on the packaging.
Apparatus and materials required:
-Microgreens seeds, Sprouting tray, Peat moss, Spray bottle
Step 1: Methods of Growing
There are media and media-less method when growing microgreens. Among them, wheatgrass can be grown using both method; other microgreens are suggested to be grown through media. Peat moss is the most suitable media in growing microgreens.
- Media-less (Wheatgrass only) Wheatgrass seeds will have to be pre-soaked for 2 to 3 days prior growing. In this case, an air-tight container will be required for soaking. Put the desired amount of seeds into the container, fill in water and close the lid. Soak for 24 hours. Rinse every 8 hours thereafter and invert the container to dry it using a mesh. The seeds will be sprouted and ready to be grow in 36 to 48 hours.

Some photos show the media-less wheatgrass growing process
- Media: Peat Moss (Suitable for all kinds of Microgreens)
Peat moss are used in growing most kinds of microgreen. It is a great starting medium for seeds, it is able to hold several times its weight in moisture and releases it to the roots as needed. It also holds onto nutrients so that they do not rinse out when watering the plant or during a rain. Starting by putting a layer of peat moss on the sprouting tray.

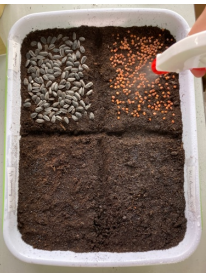
Step 2: Sow the Seeds
After putting a layer of peat moss, even it, and sow the seeds. Make sure the seeds are not too close to each other because it will easily go moldy and causing poor ventilation in the later stage.

Step 3: Give it a Spray
Spray enough amount of water to the seeds, not too much, not too little. This is important as the second spray will only happen after the seeds have sprouted. Water should be enough to last until that stage.
Spraying enough water before pressing the seeds.
Step 4: Give it some pressure
Cover it with a sheet of plastic and put something heavy on top. Plastic helps retain moisture, heavy weight helps to speed up the sprouting.

Plastic sheet and weight were being put on the seeds to retain moisture and force the sprouting.
Step 5: Remove the pressure and expose to light
The weight can be removed once it’s being lifted up by the seeds. It is a signal showing that the microgreens are ready for some light.

Sprouted seeds are ready for light. Without light exposure, they will start to elongate.
Step 6 (Last Step): Harvest!
After exposing to light, microgreens will be ready for harvest after 3 to 14 days depends on types and self-preference.

Microgreens of this sizes can be harvested.
Introduction and Growing Process:
1. Sunflower
Sunflower microgreen can be harvested during day 6 to 7.
2. Corn
Corn microgreen has shiny yellow colour and sweet taste. It is important to note that the entire growth of the corn microgreen must be in the dark condition. It will turn green as soon as meeting with light. Eating suggestion: salads, sandwiches, juice, smoothies.

3. Wheatgrass
Wheatgrass is relatively more popular amongst other microgreens. It can be drunk solely or mixed with juices. Suggested that drinking only the size of 3oz of wheatgrass shot rather than 8oz like the normal orange juice.

Wheatgrass can be harvested during Day 5.
4. White Leaf Amaranth
The seeds of white leaf amaranth are tiny so you will get a lot in a pack. It has a nutty flavour and contain 15% protein. Meanwhile, Amaranth has high germination rate and growing rate, it is one of the easy-growing microgreens.


White leaf Amaranth microgreen can be harvested from day 7 to day 9.
5. Arugula
Arugula microgreen is another easy growing microgreen and popular plant for chef. Its zesty and nutty flavour is best to spice up most dishes.

Arugula microgreen can be harvested during day 9 to 12
6. Radish
Radish microgreen is the easiest and fastest microgreen for beginners. It germinates quickly, grow fast, and easy to harvest. The size of the seed is perfect, the best choice for first-time growers to sow, raise and harvest. It is flavourful, crunchy, easy to be mixed with sauces, salads, sandwiches, and juices.

Radish microgreen can be harvested during day 6 to 8.
7. Alfalfa
Alfalfa microgreen has been a plant that grown for feeding livestock for hundreds of years. It is a part of the legume family and also considered to be a herb. One of the benefits is that the sprouts contain the same amount of nutrients and yet very low in calories, high in Vitamin K.

Alfalfa microgreen can be harvested during day 10 to 12.
8. Wasabi Mustard
Wasabi mustard microgreen has the peppery wasabi flavour which would not linger. It is one of the nicest and must grow microgreen that can be eaten with cuisines, sandwiches, salad, and dressing.


Wasabi Mustard microgreen can be harvested during day 7 to 8.
9. Pea
Pea microgreen also known as pea shoot; it has an exclusive texture which can’t find on other microgreens – tendril.

Pea microgreen can be harvested during day 10 to 12.
10. Red Amaranth
Red Amaranth microgreen is just like White Leaf Amaranth. The seeds are tiny. The stem is violet, the leaves are green. Amaranth is a very adaptive plant, it will survive under harsh environment, definitely an easy growing. It has high germination rate and growing rate.


Red Amaranth microgreen can be harvested during day 9 to 11.
11. Parsley
Parsley microgreen is a common herb used to garnish and season in many dishes across the globe. Seeds took longer to germinate, and it has lower germination rate compared to other microgreens.

Parsley microgreen can be harvested on day 15.
12. Beet
Beet microgreen has intensely purple stem and bright green leaves. Its colour is more shinny than the Red Amaranth microgreen. It is more nutrient-dense than the mature beet. The seed of the beet is easily confused with the seed of swiss chard.


Beet microgreen can be harvested on day 9 to 12.
13. Dill
Dill microgreen is best companion with fish, egg, and potato dishes. It delicious with citrusy note. Its feathery leaves and soft mouth feel make it decorative and perfect topping.

Dill microgreen can be harvested on day 15.
14. Coriander
Coriander microgreen has a distinguish fragrance and rich and complex flavour. This microgreen adds a perfect touch to dishes like curries, soups, sauces, and salads.

Coriander microgreen can be harvested on day 15.
Conclusion:
Each microgreen mentioned above can be harvested earlier than the suggested harvesting date. Some of listed were ready for harvest far earlier and some were close / almost aligned with the suggested harvesting days. It does not matter when to harvest your microgreen provided that harvesting early will preserve the tenderness and rich flavour of the microgreen. Harvesting late will sometimes causing loss or change in the desired flavour, also unwelcomed texture like trichomes that may sting both tongue and mouth. The original flavour and texture are well-retained if the microgreens were harvested before the true leaves emerge.
| Microgreens | Suggested Harvest (Day) | Actual Harvest (Day) |
| Sunflower | 7 | 7 |
| Corn | 7 | 5 |
| Wheatgrass | 10 | 5 |
| White Leaf Amaranth | 10 | 7 |
| Arugula | 10 | 9 |
| Radish | 10 | 6 |
| Alfalfa | 12 | 10 |
| Wasabi Mustard | 12 | 7 |
| Pea | 14 | 10 |
| Red Amaranth | 15 | 9 |
| Parsley | 20 | 15 |
| Beet | 21 | 9 |
| Dill | 25 | 15 |
| Coriander | 28 | 15 |
Table 2 showing the actual harvesting day based on this experiment.
This experiment was conducted under indoor condition.
One thing that worth noticing is that this experiment was conducted in an indoor environment. It is more consistent and predictable.
Mistakes that I learnt:
I failed a few times before successfully completing this experiment. It is worth sharing them from the beginning. It is important to prevent molding, which can be helped by doing the steps below. First, using a shallow container to grow. Second, use a container with holes will helps drain the excessive water. Third, sow the seeds with some distance, not too close to each other. Fourth, water it with just enough water, not too much, not too less. Spray water from above to prevent the seeds from washing away, water from beside when the leaves are big which block water from top.
To soak or not to:
Soaking seeds will accelerate the growing process, also, skinny seeds which would not germinate can be take out during the soaking process. It is suggested that only soaking the big seeds like sunflower, corn, pea, beet, and coriander. Soaking small seeds like dill, parsley, arugula, or alfalfa can be very hard to handle in the later stage. Note that seeds like sunflower will stay afloat when soaking, it is important to push down into the water.
Things to take note to:
- Root hairs, also known as absorbent hair, will sometimes be deemed as mold.
- Using coco mix to grow microgreens may cause residue on the leaves which might be troublesome to wash off later.
- Pressing the seeds into peat moss may help in the germination stage.
- Remove the weight as soon as possible to avoid elongate.
- Seed coat can be removed by hand easily in the later stage. Removing it too early may cause damage to the leaves.
Other usage of microgreens:
Other than making baby salad, microgreens can be used to garnish dishes. Mixing different types of microgreens will enhance the look and sometimes enrich the flavour of the dish. It can be done nicely with least effort because microgreen itself is beautiful.

- Goh Hao Yee (UTAR)


![[Research] The Effect of Synthetic Fertilizer and Organic Fertilizer on Plant Growth (Green ribbon)](http://cityfarm.my/cdn/shop/articles/11_69_300x.png?v=1696511389)
![[ArtIcle] Urban Farming: Opportunities and Challenges](http://cityfarm.my/cdn/shop/articles/WhatsApp_Image_2023-05-18_at_14.53.55_300x.jpg?v=1684392966)
![[Article] The Future of Indoor Vertical Farming](http://cityfarm.my/cdn/shop/articles/11_ce4d60df-c15d-4168-9051-811d2f2db016_300x.png?v=1670699733)
![[Research] The Effect of Water Temperature on Plant Growth](http://cityfarm.my/cdn/shop/articles/11_43_300x.png?v=1653919657)